Range Mapper Tutorial
By Quentin Preik

Okay, so you're rigging up some landing gear flaps with a set of landing gear using Xpresso and you want a single slider control, to drive the position of the landing gear. At first gloss this doesn't sound too hard (or does it?), a user data slider from 0% to 100% would determine the status of the landing gear. You could link the user data to a rotation or location of the various gear objects. So say a certain rod rotates 90 degrees during the deployment of the gear, you could make a formula that multiples your percentage by the number of degrees you want to move. So at 50% you are multiplying 90*0.5 for 45 degrees etc. The problem you end up with is this: say you have the door that covers the landing gear bay - it must be open *before* the gear extends, otherwise you'll end up with gear poking through your door geometry and obviously that isn't going to look right at all! You need to make sure the door opens faster than the gear deploys. Basically if you picture some sort of gear deploying - there is a bunch of stuff going on at different times, all at once. So how, using the same % slider do you use the same number to move things at a different rate? Well you could set up all the formulas and calculate everything - but you're not going to be using a simple linear formula to do this! Plus what if you want zero movement on a certain part until later in the animation (like a wheel isn't supposed to move until the last 10% of the time it takes to extend the gear)? This is where the handy range mapper Xpresso operator comes in. Basically with a range mapper you can define a curve that translates the incoming data (our control that scales from 0% to 100%) to an output curve. See Figure 1.
The Range Mapper Graph
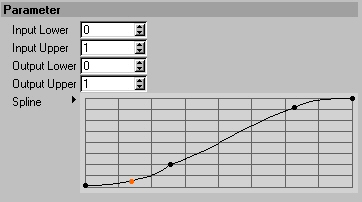
Fig. 1
So what does the graph (Fig. 1) do? Well have a look...you see the start of the graph - the curve is very slowly going up from zero - then it ramps up to the very top and levels off towards the end of the animation. So how does this translate to what we are trying to do? Well, being passed a number from a know range (something between 0 and 1) it will output according to this graph. So in our example we have probably animated the user data starting from 0 and going to 1. At the beginning, say the first 25% the end object will be moving slowly, then in the middle 50% it speeds up its motion, and 80% or so it has completed its motion and is holding steady. Heck, look at the options here, in theory this object could have begun moving in the first 25%, held steady for the middle 50% and actually reversed its movement for the final 25%! So with one control you could have an object do a full looping motion, and have several other objects do their motions at varying rates (using more than one range mapper).
Well all right, that's just a bunch of words, so let's move on to the tutorial itself - hopefully this will help you to actually see what this does instead of just reading the theory :). So what shall we do...well, in this tutorial we will make some arbitrary mechanical device - it will be in a housing with a door - so using a single control (a bit of user data), we shall be able to have the door open, and the device extend. Heck let's make a cutting wheel or saw blade type of device.
Step 1: Okay first create a null object and name it "Control". Add an Xpresso expression to it.Fig. 2 This null and Xpression will control our objects. Now selecting the Xpresso tag, add user data, the default user data options will do, but we'll probably want to name it "Device Control".
Adding User Data
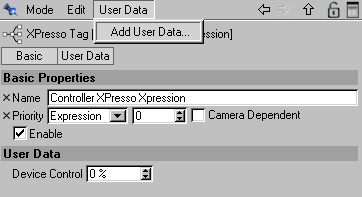
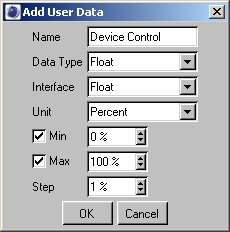
Fig. 2
Now that you've created that, when viewing the xpresso tag you'll see the bit of user data we've created (Fig. 3). Okay now we'll animate this control, so that we can see our results later. So right click on Device Control and add a key frame at frame 0. Then move to the last frame in your project, set the number to 100% and add a second key frame.
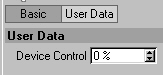
Fig. 3
