Range Mapper Tutorial, Page 2
By Quentin Preik
Step 2 Okay now we're going to make the housing for our little cutting device. Just make a couple of long, short cubes - and put a hole in one end of one of the cubes. Make a door that will fit in the hole, and make sure the pivot point is on the edge of the door so it will open properly. Name the door "door" and you'll probably also want to rename the other two objects as well.Fig. 5
Make the initial objects
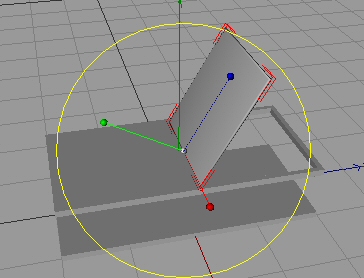
Fig. 5
So let's rig up the door! Oh sure we should probably plan the whole device out first, but I'd rather just get our hands dirty and go ahead and attach this door to your Xpresso control so you can see how this range mapper dealy works. Go to your Control object and double click on the XPresso tag, to open up the XPresso editor. Now you need to drag the XPresso tag itself into the editor, then drag the Door object on to the XPresso editor. Now add an output node to the Xpresso tag, and select our Device Control user data as an output (Fig. 6) (click on the red box, go to user data and select Device Control). Now you'll notice that the red axis is lined up with the way our door will probably open (Fig. 5). This is the Pitch axis (assuming you are using HPB rotation coordinates). So add an input node (blue box), rotation, rotation.p for our door object (note: you don't want global rotation).
Adding Xpresso Nodes
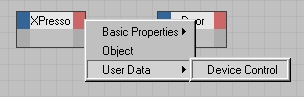
Fig. 6
Now we need to add the Range Mapper node. You can find this on the left side of the XPresso editor. Select the XPool tab, expand the System Operator list, then Xpresso, than Calculate - and you should find an entry called Range Mapper. Drag a Range Mapper operator beside our other two entries. While you're at it drag a Degree operator by the rest as well.(Fig. 7) We'll be needing this degree operator, because angles are fed to our object in radians. So once you've added the degree operator, you need to set the function to Degrees to Radians(Fig. 8) Note, when you select nodes, their settings actually don't show up in the XPresso editor, rather, by default, they will show up on the right side of your Cinema 4D Screen.
Setting Up Xpresso Nodes
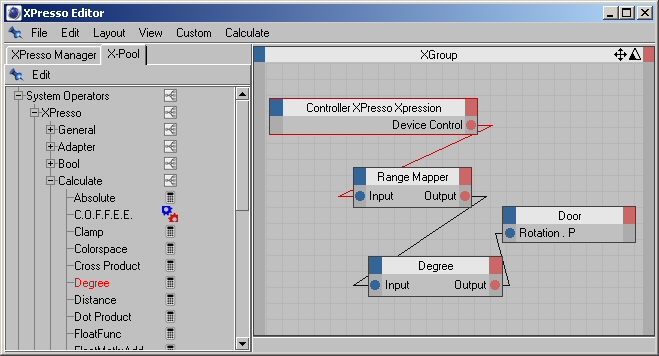
Fig. 7
Setting Up Degree Operator
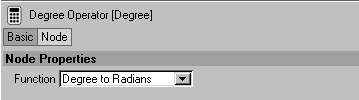
Fig. 8
Well we are almost ready to connect the nodes - first we need to change some settings on the range mapper operator. Select it and look at the right side where all its settings should show up. Under Parameter you will find the settings we are most interested in. There is Input Lower and Input Upper. These, by default are set to 0 and 1, just how we like it. (Because a % is actually a number from 0 to 1, so 50% is actually 0.5) However, we must think about Output Lower and Output Upper - these are the numbers that will be coming out of this range mapper. So have a look at your door - it is rotating its pitch. How far should it open? Well it starts at a neutral 0 degrees - i think 130 degrees (rotate the door for yourself and see what looks right) is a pretty good setting for the door when its open. So set the Output lower to zero, and the Output Upper to 130. Fig. 9 Okay now we also do need to think ahead a bit...in our animation we will have a saw blade rise up through the hole - so clearly the door needs to be out of the way first. So we need most of the door's opening to be done before the blade gets up that far - so we need to alter the graph as shown in Figure 9. To add points just click and drag them on the graph, if you add an extra point by mistake, just undo it. I think the door should open quickly, and slow down a bit due to momentum just as it gets to it's maximum open state - heck you could add in a bit of bounce back here if you're feeling fancy.
Setting up the Range Mapper Operator
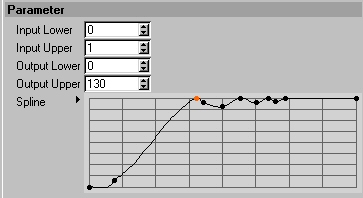
Fig. 9
All right, so let's link this stuff up! It should go like this - our Device Control number should link to the input of Range Mapper. The Output of Range Mapper should link to the input of the Degree operator. The Output of the Degree operator will link to the Rotation.P input of our Door object. That should do it...now go and watch your animation - and you should see the door moving. Note, that you won't be able to manually rotate the door anymore - that is up to Xpresso now. If you open up the XPresso editor, and select Range Mapper, then close it - you'll have an un-obstructed view of your object and you can tweak your output numbers and the graph and view the results without going back into the XPresso editor every time. Leave the animation running and tweak the curve until you are happy with the results!. Fig. 7
Hopefully you're starting to graps the potential of this range mapper operator! We are taking a simple key framed number and turning into a much more complex animated output! Now we just have to add other objects - they will all use this same single number to drive their actions. So next we'll have to make the blade itself as well as the equipment to make it extend.